Introduction
First, thanks for your interest in Emy Mobile web librarY!
There is no installation for Emy, it consists of a combination of html, css, javascript & image files. All you will need to do is download the latest archive and unpack/extract it in the location you want.
Once downloaded, "emy" folder tree should look like the following screen:
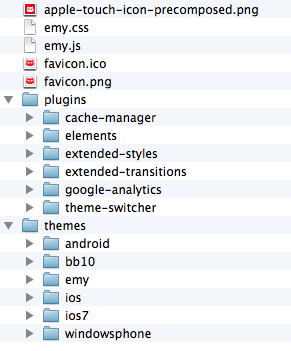
- emy.css is the main CSS file, containing only its "views“ controlling mechanism (all the rest belongs in the theme).
- emy.js is the core Javascript file.
- theme folder contains themes ready to use. They all consists of a "main.css" file & other files needed (images, icons, webfont,...) which deals with colors, fonts, margins, padding, ...
- apple-touch-icon-precomposed.png is only used by Apple devices when user taps "add to homescreen" (optional)
- favicon.png & favicon.ico are used by browsers for different purpose (icon next the the url, bookmark, ... optional)
- plugins folder contains add-ons for Emy, for features not needed for basic scenario (optional)
Let's do some code
In order to start playing with Emy, you first need to create a basic HTML file that pulls in Emy's CSS and Javascript, plus a couple of meta tags. Here's what it looks like:
<!DOCTYPE html>
<html lang="en">
<head>
    <meta charset="utf-8">
    <title>My app</title>
    <meta name="viewport" content="width=device-width, initial-scale=1.0, maximum-scale=1.0, user-scalable=0">

    <link rel="stylesheet" href="emy/emy.css" type="text/css">
    <link rel="stylesheet" href="emy/themes/ios/main.css" type="text/css">
    <script type="application/x-javascript" src="emy/emy.js"></script>

  </head>
  <body>
    ...
  </body>
</html>
Everything else will be done inside the body tag. Emy is a single-page application library, which means all "views" and the "toolbar" are part of the HTML document on load. The main difference between Emy and other mobile web libraries is the way the toolbar is managed. The toolbar sits at the top of your app's screen and serves as the main menu for navigation and content titles.

Where other frameworks require you to redefine a toolbar for every individual page/screen, Emy keeps the toolbar fixed and changes its title automatically (based on the value of the data-title attribute of the active screen).
The basic type of view in Emy is the panel-type view, which must be a top-level section element (i.e. directly under the body element) with a "panel" class. Let's start with a couple of views and a toolbar.
<body>

    <header class="toolbar">
      <div><a id="backButton" class="button" href="#"></a></div>
      <h1 id="viewTitle"></h1>
    </header>

    <section id="first" data-title="First View" selected="true">
        <a href="#second">Go to second view</a>
    </section>

    <section id="second" data-title="Second View" class="panel">
      My second view.
    </section>

</body>
This should ends up looking something like this:
Typical rookie mistake is to forget selected="true" on the first view to display by default (you won't see anything if not set).
As you can, the toolbar renders "First View". Emy gets the data-title attribute of the current view to populate this h1 element. When user navigates/slides to a new view, it automatically update this h1 element text by this new view data-title value. (advice: keep it short !)
While this technically works, the link doesn't exactly look like a native app, nor does it comply with the Apple Human Interface Guidelines. For that, we should put the link in a table view. In Emy, a table view is an unordered list (ul), like this:
<body>
<header class="toolbar">
<div><a id="backButton" class="button" href="#"></a></div>
<h1 id="viewTitle"></h1>
</header>
<section id="first" data-title="First View" selected="true">
<ul>
<li><a href="#second">Go to second view</a></li>
</ul>
</section>
<section id="second" data-title="Second View" class="panel">
My second view.
</section>
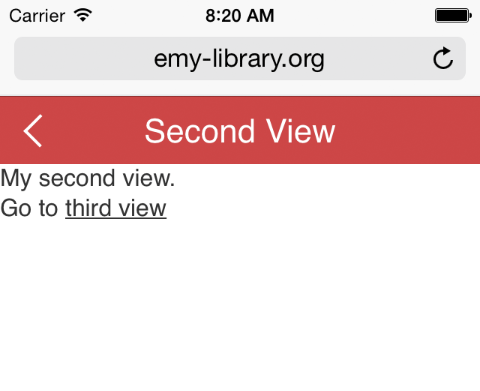
</body>This should ends up looking something like this:
Of course, it doesn't do you a whole lot of good to have two screens without a way to navigate between them.
Navigate between views is easy, since you just need a link to its ID prefixed with a number sign (aka anchor or hash). To go to the second view, which has an ID equals to "second", i just need a link to "#second".
Let's add a link, a third screen and a couple of IDs:
<body>
<header class="toolbar">
<div><a id="backButton" class="button" href="#"></a></div>
<h1 id="viewTitle"></h1>
</header>
<section id="first" data-title="First View" selected="true">
<ul>
<li><a href="#second">Go to second view</a></li>
</ul>
</section>
<section id="second" data-title="Second View">
My second view.<br>
Go to <a href="#third">third view</a>
</section>
<section id="third" data-title="Third View" class="panel">
My third view.
</section>
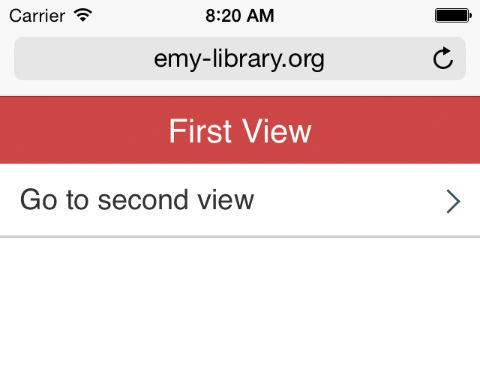
</body>Now you should have a link on your first screen that does a smooth sideways animation to the second screen, which should look like this:

Congratulations! You've just created your first, working Emy application!
This sample app code is available here. You can also test & edit it live on codio.
You may have noticed there is a piece of code in there for a "backButton"but no back button appears in this page. Just like the toolbar itself, Emy takes care of the back button and shows it only when needed. If there is no previous screen in your navigation history, the back button is hidden. It shows up automatically and is titled using the previous screen's data-title attribute value.